by
by Learn React.js
This comprehensive guide is your key to mastering React.js, catering specifically to those eager to ‘learn React.js.’ Our step-by-step approach ensures that beginners can grasp the fundamentals while diving deep into the intricacies of React.js. Through practical examples and hands-on exercises, you’ll not only ‘learn React.js’ but also gain the confidence to build dynamic and interactive web applications from the ground up. Join us on this learning journey, and by the end, you’ll have cracked the code to proficiently ‘learn React.js’ and excel in modern web development.
Introduction
What is ReactJs?
To put it simply, ReactJs is an open-source JavaScript library used to create front-end web applications and user interfaces (UIs).
It offers us a plethora of features to create web applications with optimal performance, regardless of their size or complexity. Developers can create dynamic and interactive user interface (UI) components with ReactJs, a highly optimized JavaScript library that is especially popular for single-page applications (SPAs).
Who is the founder or developer of ReactJs?
ReactJs was written by Jordan Walke, a software engineer at Meta (Facebook). Consequently, Facebook developed it in 2011 but did not formally launch it until 2013.
Since that time, React.js has become one of the most widely used JavaScript libraries for creating user interfaces.
Why do we choose ReactJs?
ReactJs is widely used due to its strong features, scalability, performance, and flexibility. Numerous developers have selected it. It is growing in popularity every day.
Thus, learning ReactJs is essential if you want to work as a front-end or full-stack developer.
Key features
- Component-Based Architecture
- Virtual DOM
- JSX
- Unidirectional Data Flow
- Extensions
- Simplicity
- Performance Optimization
- StrongCommunityandEcosystem, etc.
Prerequisites to learn ReactJs
To create the structure of web pages, you should be well-versed in HTML (Hypertext Markup Language), and CSS (Cascading Style Sheets) in styling and layout. You should also be familiar with the fundamentals of JavaScript.
Essential JavaScript for ReactJs
You should be familiar with some fundamental JavaScript concepts before learning React JS. It will assist you with some of the fundamental JavaScript ideas of ReactJs. Thus, all of the JavaScript subjects that you should be familiar with before beginning to learn ReactJs are covered here.
- Functions and Arrow Functions
- JavaScript Objects
- Array and array methods
- Destructuring
- Template literals
- Ternary Operators
- ES Modules and Import/Export Syntax
Prerequisites to install ReactApp
You must install the most recent version of Node.js on your system before installing ReactApp.
Since React is a JavaScript library and Node.js offers a runtime environment, JavaScript can be executed outside of the browser. Additionally, after installing Node.js on your system, you can use npm to install and manage dependencies in your React projects.
If you have not installed Node.js yet, then let’s see how to install it and which version to
install. First, go to the official website of Node.js https://nodejs.org
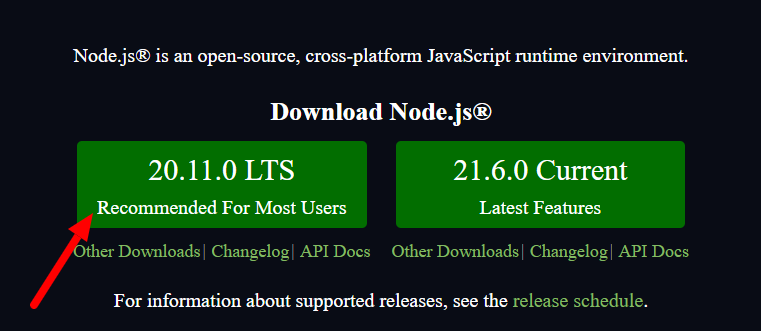
Download the 20.11.0 LTS version, as it is recommended for most users and it’s widely used
by developers for production environments.
After the installer is downloaded. Install it by launching the installation wizard and following all
instructions of installation wizard, accepting the license agreement, and choosing the default
installation settings.
After the installation, open the Command Prompt or PowerShell or Terminal (If you use
macOS) then run the command node-v to check if Node.js is successfully installed.
ES6 in React
What is ECMAScript?
The scripting language known as ECMAScript is based on the ISO/IEC1623 and ECMA-262 specifications and standards published by ECMA International Company. It was developed to bring about multiple implementations by standardizing the JavaScript language.
Features of ES6
ES6 has introduced several new features mentioned below:
- Variables
- Arrow Function
- Modules
- Classes
- Array Methods like map()
- Destructuring
- Ternary & Spread Operator
Arrow function
Arrow functions are a shorthand syntax for writing function expressions which makes your
code more readable and organized. Arrow functions can be declared without the function
keyword.
The basic syntax of Arrow Functions:
const functionName = (parameters) => {
return returnValue
};
Arrow functions with no parameters:
const add = () => {
return "Hello World"
};
console.log(add());
// Output: Hello World
Arrow functions with parameters:
const add = (a ,b) => {
 return a + b
 };
 console.log(add(12, 25));
 // Output: 37
Arrow function with a single expression(implicit return):
 const add = (a,b) => a + b
 console.log(add(12 , 25))
 // output: 37
Modules
JavaScript Modules allow you to break up your code into separate files. Modules can be
imported and exported.
To define a module, you use the export statement to indicate which parts of the module
should be accessible from the outside, and you use the import statement to bring those
exported parts into another module.
Named Exports:
Suppose you have a user.js file.
export const name = "Ankit"
export const age = 22
const name = "Ankit"
const age = 22
 export {name, age};
Default Exports
const person = () => {
const name = "Ankit";
const age = "22"
 return `My name is ${name},i am ${age} years old.`
 }
 export default person;
Import
Named import
import { name, age } from "./user.js";
console.log(`My name is ${name},i am ${age} years old.`)
Default import
import person from "./user.js";
console.log(person())
Classes
A class is a type of function, but instead of using the keyword ‘function'to initiate it, we
use the keyword ‘class', and the properties are assigned inside a ‘constructor()‘ method.
class Person {
 constructor(name) {
   this.personName = `My name is ${name}`;
  }
 }
 const Person1 = new Person("Ankit")

 console.log(Person1.personName);
Method in Classes
class Person {
  constructor(name) {
    this.personName = name;
  }
  sayHello() {
    return `My name is ${this.personName}`
  }
 }
 const me = new Person("Ankit")
 console.log(me.sayHello())
 //Output: My name is Ankit
Array Methods like map()
In React the .map() array method is very useful. It allows you to create a new array by
running a function on each element of an existing array. Example:
const myArray = [
 { id: 1, name: 'Ankit' },
 { id: 2, name: 'Ashok' },
 { id: 3, name: 'Amit' }
 ]
 const names = myArray.map((person) => person.name);
 console.log(names);
 // output: ['Ankit', 'Ashok', 'Amit']
Destructuring
Destructuring is a way to extract values that we exactly want from objects and arrays into
distinct variables. Like:
Destructuring Objects:
const user = {
 firstName: "Elon",
 lastName: "Musk",
 age: "25",
 phoneNumber: "1234567890"
 };
 const {firstName, age} = user;
 console.log(firstName) // output: Elon
 console.log(age) // output: 25
Here using the destructuring method I have extracted values from the user object and
assigned them to variables firstName and age.
Destructuring Arrays:
const basket = ["Apple", "Banana", "Pineapple", "Orange", "Strawberries"]
 const [fruit1, fruit2] = basket;
 console.log(fruit1); // Apple
 console.log(fruit2); // Banana
Here using the destructuring method I have extracted values from the basket Array and
assigned them to variables fruit1 and fruit2.
Spread Operator
The JavaScript Spread Operator (…) allows us to quickly copy all or part of an existing
Array or object into another array or object. Like this:
const basket = ["Apple", "Banana", "Pineapple", "Orange", "Strawberries"]
 const [fruit1, fruit2, ...restAllFruits] = basket;
 console.log(fruit1); // Apple
 console.log(fruit2); // Banana
 console.log(restAllFruits); // ['Pineapple', 'Orange', 'Strawberries']
Ternary Operator
The ternary operator in JavaScript is a simplified way of writing a conditional statement like
if/else.
The syntax of the ternary operator is as follows:
condition ? expressionIfTrue : expressionIfFalse;
Example of using if/else:
const age = 20;
 if(age >= 18) {
 console.log("You are an adult.")
 }else{
 console.log("You are not an adult!")
 }
Same Example of using Ternary Operator:
const age = 20;
 const message = age >= 18 ? "You are an adult." : "You are not an adult!"
 console.log(message);
Installation and setup
ReactJs has a feature that you can install your react app by using create-react-app
Open your terminal in the directory you would like to create your application. Then run this
command:
npx create-react-app my-react-app
In place of the “my-react-app” in this command line, you can replace and write the name of
your app.
React App naming criteria
When creating your React App and specifying its name, you must follow this criteria: you
should keep all the letters small & there should be no spaces in it.You can use hyphen(-)
instead of space.
File structure
After completing the React app installation, we get the default folder structure of
React.
It’s something looks like this:
Let’s understand the whole folder structure of our React App here.
my-react-app/
 ├──node_modules/
 ├──public/
 │ ├──index.html
 │ ├──favicon.ico
 │ └──...other static assets like (Images, txt & json files, etc.)
 ├──src/
 │ ├──index.js
 │ ├──App.js
 │ ├──index.css
 │ ├──App.css
 │ ├──components/
 │ │ ├──Component1.js
 │ │ └──Component2.js
 │ ├──assets/
 │ │ └──...other assets like images, fonts, etc.
 │ └──...other application files
 ├──package.json
 ├──package-lock.json
 ├──.gitignore
 └──...other configuration files
- node_modules: This folder is automatically generated. It contains project
dependencies. You don’t need to edit this folder, it is managed by npm. - public: This folder contains static files/assets like images, logos, robots.txt, other JSON files, and the main index.html for the application. Here the index.html file loads our react app and renders it on the browser.
- src: The src folder is known as the source folder. It contains the main source code of the React app.
- index.js: Inside the src folder there is an index.js file. This is the entry point of the React app, where the root component (App.js) is rendered into the DOM.
- App.js: This is the root component of the React app.
- Index.css: This CSS file is used to set the default style of the overall layout like the default font styles, margins, paddings, etc. You can create CSS variables here.
- App.css: This CSS file is used for our root component App.js.
- components: You can create a components folder inside the src folder. Here we will create reusable React components, which we use throughout the React App. We will discuss this in detail in the React Components chapter.
- package.json: This is the configuration and dependencies file. This file contains important metadata about the project, including its name, version, dependencies, scripts, and more.
- package-lock.json: It’s automatically generated by npm for package version consistency. You don’t need to edit anything in this file.
- .gitignore: Specifies files and directories that should be ignored by Git version control.
- README.md: Project documentation, providing an overview of the project and instructions on how to run it.
Run the React App
It’s time to run our React Application. So you can run the app by invoking the start script
configured in the package.json file. Use this command:
npm start
Compiled successfully!

You can now view my-react-app in the browser.
  Local: http://localhost:3000
  On Your Network: http://192.168.143.226:3000

Note that the development build is not optimized.
To create a production build, use npm run build.
webpack compiled successfully
Then it will start the application in the local system and a new browser window will
automatically popup with http://localhost:3000/
If the browser does not popup automatically, then open your favorite browser and go to
http://localhost:3000/
Customize the code
Now you have your React app running, you can start customizing it:
The main source of customization will be in the src/App.js file. You can edit this file to
create and customize React components and their behavior.
import logo from './logo.svg';
 import './App.css';
 function App() {
 return (
 <div className="App">
 <header className="App-header">
 <img src={logo} className="App-logo" alt="logo" />
 <p>
 Edit <code>src/App.js</code> and save to reload.
 </p>
 <a
 className="App-link"
 href="https://reactjs.org"
 target="_blank"
 rel="noopener noreferrer"
 >
 Learn React
 </a>
 </header>
 </div>
 );
 }

export default App;
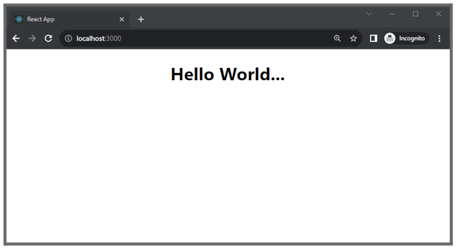
Anything you change here will be rendered on the HTML page. I have changed the code. I have removed the unnecessary part and only added a <h1> element.
Make sure you have saved the file after changes!
import './App.css';
 function App() {
 return (
 <div className="App">
 <h1>Hello World...</h1>
 </div>
 );
 }
 export default App;
output looks like this:
You can create new components in separate files within the src directory and import them
into App.js
The src/App.css file allows you to add custom CSS styles for your components.
You can modify the public/index.html file to add or change the page title, add metatags,
or link to external stylesheets, etc.
React JSX
What is React JSX?
JSX represents JavaScriptXML.It is a syntax extension used in React to define and describe the structure of React elements, making it easier to write and add HTML to React. It is not a separate language.
It allows you to write HTML elements directly in your JavaScript code.
Here is an example of without JSX:
Earlier we had to make an HTML element or append it to existing ones with these
traditional DOM manipulation methods createElement() / appendChild()
import React from 'react';
 function App() {
 return (
 React.createElement('h1', {}, 'Hello World!')
 );
 }
 export default App;
Here is an example of JSX:
Look, Using JSX we can write HTML syntax directly like this.
import React from 'react';
 function App() {
 return (
 <h1>Hello World!</h1>
 );
 }
 export default App;
JSX Embedding Expressions
You can write JavaScript expressions inside the curly braces {} in JSX. Here is some code
examples of JSX expressions are given below for better understanding:
Variables:
function App() {
 const name = "Code With Random"
 return (
 <h1>Hello, {name}</h1>
 );
 }
 export default App;
 // output
 // Hello, Code With Random
Mathematical Operations:
function App() {
 return (
 <h1>{10 + 5}</h1>
 );
 }
 export default App;
 // output
 // 15
JSX Attributes
In JSX, you can use attributes in HTML elements as regular HTML. Remember, JSX
attributes use the camelCase naming convention so when you add attributes, you have to
specify its name using the camelCase naming convention. For example, class attribute becomes
className.
Here are some examples of JSX attributes given below:
Class and Style Attributes
function App() {
 return (
 <h1 className="title" style={{color: "green"}}>
 Code With Random
 </h1>
 );
 }
 export default App;
htmlFor instead of for
<label htmlFor="input1"></label>
onClick instead of onclick
<button onClick={myFunction}>Login</button>
Dynamic Attributes
You can set attributes dynamically based on variables or expressions.For example:
function App() {
 const isDisabled = true;
 const buttonText = "Login"
 return (
 <button disabled={isDisabled}>{buttonText}</button>
 );
 }
 export default App;
React Components
What is a React Component?
React is a component-based Javascript library, as I mentioned before. Therefore, React’s components are its essential and core building blocks. In a nutshell, a component is a section of code that can be utilized anywhere in the React application.
The process of creating user interfaces is greatly facilitated by components, which also improve code organization, reusability, and maintainability.
Types of React Components
In React, there are mainly two types of components, Class components and Functional
components. Let’s know more about these components.
Functional Components
Functional components are also known as stateless components. These are simply
javascript functions and are made with simple JSX code. These components are simple to use
and easy to understand.
Let’s understand the functional components through the examples:
First, create a folder and give its name “components” inside the src folder. Then insidesrc/components create a new file called User.js it will be our functional component.
├──src/
 │ ├──components/
 │ │ └──User.js
 └──...other files and folders
import React from 'react'
 function User() {
 return (
 <h1>Ankit</h1>
 )
 }
 export default User;
Then import this component and render it in App.js, Like the below example:
import "./App.css"
 import User from "./components/User";
 function App() {
 return (
 <div className="App">
 <User/>
 </div>
 );
 }
 export default App;

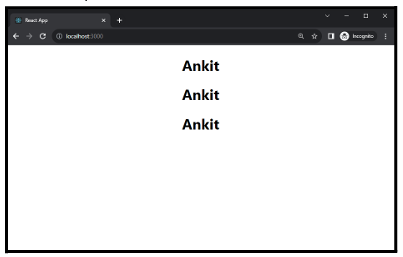
If you use that component multiple times, the output will also change and render the
component multiple times. For example:
import "./App.css"
 import User from "./components/User";
 function App() {
 return (
 <div className="App">
 <User/>
 <User/>
 <User/>
 </div>
 );
 }
 export default App;
Class Components
Comparing class-based components to functional components, they differ slightly in complexity.
Class components can be used when react needs to maintain its state because they are stateful. Data can be passed between Class components. These are frequently utilized in intricate projects.
Class Component Syntax
A class component must include the extends React.Component statement. It also
requires a render() method. Like this:
class Componentname extends React.Component {
 render() {
 return (
 <h1>Welcome Text!</h1>;
 )
 }
 }
 export default Componentname;
You can write extends Component instead of extends React. Component, but you
have to import Component from React first. As the example below:
import React, {Component} from 'react'
 class Componentname extends Component {
 render() {
 return (
 <h1>Welcome Text!</h1>;
 )
 }
 }
 export default Componentname;
React Fragment
In React, fragments allow you to return multiple elements in a component without wrapping
them in a parent container.
Why use React Fragment?
In React when you render multiple elements it will require a ‘div’ tag around the content as this will only render a single root node inside it at a time.
import React from 'react'
 function User() {
 return (
 <p>Hello</p>
 <p>User</p>
 )
 }
 export default User;
 Error!!!
In the above code example, I have tried to render two elements without a parent wrapper. So, this will show an Error!
To correct it you have to add a <div> element to wrap those two <p> tags.Like this:
import React from 'react'
 function User() {
 return (
 <div>
 <p>Hello</p>
 <p>User</p>
 </div>
 )
 }
 export default User;
If you wish to avoid adding an extra or other container element to the DOM in this instance, you can do so. Then, React Fragment must be used.
import React from 'react'
 function User() {
 return (
 <React.Fragment>
 <p>Hello</p>
 <p>User</p>
 </React.Fragment>
 )
 }
 export default User;
Or you can use a shorthand syntax called “empty tags” or “fragment shorthand” (<></>).
 import React from 'react'
 function User() {
 return (
 <>
 <p>Hello</p>
 <p>User</p>
 </>
 )
 }
 export default User;
React Styling
React offers multiple methods for applying CSS styling to its component elements. Generally speaking, className attributes in CSS classes allow us to add CSS styles to React components.
As you know React JSX supports JavaScript Expressions, so there are many methods to add CSS to React components.
We will learn here the three most common ways of CSS styling in React:
- Inline styling
- CSS stylesheets
- CSS Modules
Inline CSS
Normally, we can add inline CSS by using style attributes to the JSX elements. But as you learned in the JSX chapter, JavaScript expressions are written inside curly braces in JSX, and since JavaScript objects also use curly braces, so when you use inline CSS styles in JSX, you have to use double curly braces ({{}}). For example:
Inline CSS styles in regular HTML:
<h1 style="color: red; background-color: blue;"}>Hello Style!</h1>
Inline CSS styles in JSX.
import React from 'react'
 function User() {
 return (
 <h1 style={{color: "red", backgroundColor: "blue"}}>Hello Style!</h1>
 )
 }
 export default User;
As you can see in the above example, how I have used Inline CSS styles in JSX.There are
two more things to be noted and keep in mind:
- When you add more than one CSS style, then you have to use a comma (,) to separate each.
- You have to use the camelCase naming convention with CSS properties, when you use CSS properties with hyphen separators like background-color in Inline CSS, it must be written in camelCase. For example: backgroundColor `, font size, etc.
Inline CSS using JavaScript Objects
You can use Inline CSS by passing a JavaScript Object. For that, you have to first create an
object with CSS styling information, then use that object in the style attribute of the JSX
element.
See the example below, I have created an object named mystyles with the CSS
properties, then I used it in the style attribute of H1
import React from 'react'
 const myStyles = {
 color: "red",
 backgroundColor: "blue",
 fontSize: "150px"
 };
 function User() {
 return (
 <h1 style={myStyles}>Hello Style!</h1>
 )
 }
 export default User;
CSS Stylesheets
Writing CSS in a stylesheet is probably the most common and basic approach to styling a React application. It’s very easy to use and understand.
The CSS stylesheet method has many features like CSS variables to store dynamic values, advanced selectors to select child elements with precision, and pseudo-classes like ::after, ::before, :hover , etc.
You can use regular CSS stylesheets to style your components in React. Using CSS stylesheets in React is similar to using CSS stylesheets in traditional web development, but there are a few differences between them.
Let’s talk about How to use CSS stylesheets in React.
- First, create a CSS file inside the src folder, and give its name whatever is your choice but when you create a CSS file for a specific component, then I recommend giving its name the same as that component name. For example: if I have a component named User.js then I will create a CSS file for it named
User.css. - Then import that CSS file into the Components. For example:
import React from 'react'
 import "../User.css"
 function User() {
 return (
 <h1 className='Heading'>Hello Style!</h1>
 )
 }
 export default User
After importing the CSS file into the component, you can write the CSS to style that component.
CSS Modules
Styling your React application using CSS Modules is a very popular approach. It allows you to write modular, reusable, and scoped CSS styles for your components. CSS modules make it easier to manage styles within components.
This method is the same CSS stylesheets method but there are some fundamental differences between them. Let’s understand with examples:
First, in this method when we create a CSS file we have to follow its naming convention. Instead, we have to use .module.css it of the file extension. So, we have created a CSS file named User.css for the User component, we will change this name to User.module.css.
Then import that CSS module file with a JavaScript expression named styles into the User Components. Like:
import styles from "../User.module.css"
Then to apply style to your JSX element, you need to use mapped class names from the styles object. Like, here styles are the object & heading is the class name. The code example below:
import React from 'react'
 import styles from "../User.module.css"
 function User() {
 return (
 <h1 className={styles.heading}>Hello Style!</h1>
 )
 }
 export default User;
Then you can write CSS in your User.module.css file.
React Props
Props is short for “Properties.”They consist solely of text. Prop is an object that, like HTML attributes, stores the value of a JSX element’s attributes.
Props are used to transfer data from parent to child components, increasing the dynamic nature of the components. For example, we can pass data as props whenever we call child components from parents.
Let’s see the example of How to pass and receive the Props:
Passing Props in Components
In the parent component, when you render the child component, you can pass props by adding attributes to the child component.
For example, I created a component named User, then I imported it App.js asApp.js is our root component, the same as the parent component.
Then I rendered the User component with name & age attributes in App.js.
Here the name & age are props and “Ankit” & “22” are the values of those props.
// App.js
 import User from "./components/User";
 function App() {
 return (
 <div className="App">
 <User name="Ankit" age="22"/>
 </div>
 );
 }
 export default App;
Receiving Props in Components
After passing the Props in the parent component to the child component, you can access those Props using props object in the child component.
The user component receives props as function parameters then it uses the value of props by defining the parameter as an props object. Then renders its value inside the JSX elements.
// User.js
 import React from 'react'
 function User(props) {
 return (
 <p>My name is {props.name} and I am {props.age} years old.</p>
 )
 }
 export default User;
 // Output
 // My name is Ankit and I am 22 years old.
Props in Class Components
Here is an example of how to use Props in Class Based Components.
// User.js
 import React from 'react'
 class User extends React.Component {
 render(){
 return (
 <h1>{this.props.name}</h1>
 )
 }
 }
 export default User;
ReactProps is not limited to simple data types like Strings or Numbers. You can pass different types of data values through Props. Here are some data types given below, which React Props can support its data type.
- String
- Number
- Boolean
- Objects
- Array
- Functions, etc.
Objects as props
Let’s see How you can pass props as objects in React components.
In the below example, I have created an object called user Data with properties such as name and age. Then I passed this object as a prop to the User component.
// App.js
 import User from "./components/User";
 function App() {
 const userData = {
 name: "Ankit",
 age: "22"
 };
 return (
 <div className="App">
 <User userData={userData}/>
 </div>
 );
 }
 export default App;
Then, we can access these object props in the User component something like this:
// User.js
 import React from 'react'
 function User(props) {
 return (
 <p>My name is {props.userData.name} and I am {props.userData.age} years old.</p>
 )
 }
 export default User;
Similarly, you can also pass props as JS Events and Functions. We will learn this in further chapters.
React Events
JavaScript Event handling is a fundamental part of front-end development. It is an action that can be triggered as a result of a user action. Like mouse click, window resize, key press, etc.
React Event Handling
React has its Event handling system known as Synthetic Events. It is very similar to standard DOM events.
This synthetic event system wraps native browser events and provides a consistent cross-browser API.
Handling Events in React have some important syntactic differences like:
- As we learned in JSX Attributes, React Event names should be written in CamelCase instead of lowercase names in regular HTML & vanilla JavaScript. For example
onClickinstead ofonclick. - In JSX, a function should be passed as the event handler instead of a string. For example:
Instead of declaring like this:
<button onClick="submitForm()">Submit</button>
Do like this. This is the event declaration in React.
<button onClick={submitForm}>Submit</button>
Here, I have created an event handler function called handleClick, then I have added this function into the button element using the onClick attribute.
When the user clicks on that button, the handleClick the function will be executed.
function App() {
 const handleClick = () => {
 console.log("Button Clicked")
 };
 return (
 <div className="App">
 <button onClick={handleClick}>Click Me!</button>
 </div>
 );
 }
 export default App;
When you click on the button, the log value is printed on the browser console. so our event handler function is working properly.
Event Handler in Class Component
Defining the event handler & Attaching the event handler to the JSX elements method within the Class Components is a little different than the functional components. See the code below:
import React, {Component} from 'react'
 class User extends Component {
 handleClick = () => {
 console.log("Button Clicked")
 };
 render(){
 return (
 <button onClick={this.handleClick}></button>
 )
 }
 }
 export default User;
Passing Arguments
You can pass arguments to an event handler by using Arrow Functions in React. Let’s see some examples.
In the below code example, I have used an Arrow Function as the onClick event handler and passed a string value “Button Clicked” as an argument to the handleClick function.
function App() {
 const handleClick = (value) => {
 console.log(value)
 };
 return (
 <div className="App">
 <button onClick={() => handleClick("Button Clicked")}>Click Me!</button>
 </div>
 );
 }
 export default App;
Event Object in a React event handler
When an event is executed, a synthetic event object is created and passed as an argument to the event handler function in React.
function App() {
 const handleClick = (e) => {
 console.log(e.target)
 };
 return (
 <div className="App">
 <button onClick={handleClick}>Click Me!</button>
 </div>
 );
 }
 export default App;
But, when you pass arguments to the event handler by using the arrow function, in that case, the event object is not automatically passed as an argument to the arrow function.
So to access the synthetic event object in that case, you have to pass it explicitly as an argument to the arrow function. Something like this:
function App() {
 const handleClick = (e) => {
 console.log(e.target)
 };
 return (
 <div className="App">
 <button onClick={(e) => handleClick(e)}>Click Me!</button>
 {/* note this syntax */}
 </div>
 );
 }
 export default App;
React State
React State is a fundamental concept that represents the mutable part of a component and is used to store information that can change over time and affect the component’s behavior and rendering.
State is a JavaScript object associated with a component and is used to store data that can be updated and cause the component to re-render when changes occur. The state can be accessed using the this.state a member variable in the component. But it’s not accessible or modifiable from outside the component.
To manage the state in a Class Component, you use the setState() method, and in
Functional Components, you can use the useState() hook.
State Management in Class Component
In Class Component you can access the state using the this.state and you can update state using the setState() method and control how the component re-renders when the state changes.
To initialize the state in the Class Component, we will use a special method called Constructor.
Constructor in React
The constructor is a special method used to initialize an object’s state and bind event handlers in a class component. When you implement the constructor, you need to call the super(props) method before any other statement. Like this:
 constructor(props) {
 super(props);
 }
It is necessary to call super() inside a constructor. If you need to set a property (prop) or access this inside the constructor, you need to call super().
After calling the super(props) method If the component needs to use a local state, you can
directly use ‘this.state’ to assign the initial state in the constructor.
Example of state management in a Class Component
So, here we will create a Counter.
First create a Class Component named Counter (Counter.js), inside the src/components folder.
import React, { Component } from 'react';
 class Counter extends Component {
 render() {
 return (
 <div>Counter</div>
 );
 }
 }
 export default Counter;
Then in the constructor method initialize the state using the this.state property.
 import React, { Component } from 'react';
 class Counter extends Component {
 constructor(props) {
 super(props);
 this.state = {
 count: 0,
 };
 }
 render() {
 return (
 <div></div>
 );
 }
 }
 export default Counter;
Here it initializes the component’s state object with an initial count value 0.
Then define an arrow function named increment to update the count state.
When the increment function executes, the setState method will update the count state by incrementing the current value by 1. Like this:
import React, { Component } from 'react';
 class Counter extends Component {
 constructor(props) {
 super(props);
 this.state = {
 count: 0,
 };
 }
 increment = () => {
 this.setState({ count: this.state.count + 1 });
 };
 render() {
 return (
 <div></div>
 );
 }
 }
 export default Counter;
Then use the render() method to return JSX elements. Here It renders a ‘<div>‘ containing a paragraph(‘<p>‘)element displaying the current `count`, and a ‘<button>‘ element with an `onClick` event handler that triggers the `increment` function when clicked.
 ...other code, as given above
 render() {
 return (
 <div>
 <p>Count: {this.state.count}</p>
 <button onClick={this.increment}>Increment</button>
 </div>
 );
 }
 }
 export default Counter;
React Hooks
React has introduced a feature called React Hooks from the React 16.8 version. This feature allows functional components to have state and lifecycle management without using class components.
What is React Hooks
React Hooks is a feature that allows you to use features like State, Lifecycle methods, etc in functional components. React Hooks are special functions that start with the prefix “use” (for example: useState, useEffect, useRef, etc.) and they provide a way to reuse stateful logic across the components without using class components and higher-order components (HOCs).
React provides us with some built-in Hooks and also allows us to create custom Hooks as well. So first we will learn about built-in Hooks.
Here are the list of built-in Hooks in React:
● useState
● useEffect
● useRef
● useMemo
● useReducer
● useContext
● useCallback
● useLayoutEffect
● useImperativeHandle
● useDebugValue
How to use React Hooks
useState Hook
The useState Hook allows you to add and track states in functional components. It returns a state variable and a function to update that state.
const [stateVariable, setState] = useState(initialValue);
In the basic syntax of useState, here the stateVariable is a state variable that holds the current state value.
setState is a function used to update the state variable. It takes a new value as an argument and triggers a re-render with the updated state.
initialValue is the initial value of the state variable. It is only used during the first render of the component.
First import the useState Hook in your functional component. Like this:
import React, {useState} from "react";
Here count is a state variable, and setCount is a function to update the state value. These names are like variables, so you can name the many things as you want.
Here 0 is the initial state and the initial state is stored in the count variable. I render the
count variable as a JavaScript expression in the JSX element (h2). Output will be: 0
import React, {useState} from "react";
 function App() {
 const [count, setCount] = useState(0);
 return (
 <div className="App">
 <h2>{count}</h2>
 </div>
 );
 }
 export default App;
Then I created an event handler function called handleClick. Inside this function, I have called setCount(count + 1), added this event handler function to the button JSX element.
So, when the button is clicked by the user, the count state will keep updating and incrementing, and 1 will be added to the count value every time the button is clicked.
import React, {useState} from "react";
 function App() {
 const [count, setCount] = useState(0);
 const handleClick = () => {
 setCount(count + 1);
 };
 return (
 <div className="App">
 <h2>{count}</h2>
 <button onClick={handleClick}>Click Me!</button>
 </div>
 );
 }
 export default App;
FinalOutput:1,2,3,4,5,6,…
useEffect Hook
The useEffect Hook allows you to perform side effects in your functional components. Side effects in React refer to any action that affects the outside world, such as data fetching, directly updating the DOM, setting up event listeners, etc.
useEffect accepts two arguments, the second one is optional, but in some cases, you need to use it.
 useEffect(() => {
 }, [])
In the useEffect syntax, the two arguments are function and dependency array.
Example of useEffect Hook in a functional component
First import the useEffect Hook and useSate Hook in your functional component.
import { useState, useEffect } from "react";
 function Counter() {
 const [count, setCount] = useState(0);
 useEffect(() => {
 setTimeout(() => {
 setCount((count) => count + 1);
 }, 1000);
 });
 return <h1>I have rendered {count} times!</h1>;
 }
 export default Counter;
In the above code example, I have created a simple counter. The useEffect hook is used to handle side effects in this component. In this case, it sets up a timer using setTimeout. After a delay of 1000 milliseconds (1 second), it updates the count state by incrementing its current value using the setCount function. It runs on every render.
As you noted the setCount function is used in a callback to ensure that the update is based on the latest value of the count.
import { useState, useEffect } from "react";
 function Counter() {
 const [count, setCount] = useState(0);
 useEffect(() => {
 setTimeout(() => {
 setCount((count) => count + 1);
 }, 1000);
 }, []);
 return <h1>I have rendered {count} times!</h1>;
 }
 export default Counter;
In the second example, after adding the empty dependency array[] passed as the second argument to useEffect indicates that the effect should only run once on the first render, specifically after the component mounts.
function Counter() {
 const [count, setCount] = useState(0);
 const [data, setData] = useState('');
 const handleChange = (e) => {
 setData(e.target.value)
 }
 useEffect(() => {
 setCount((count) => count + 1);
 }, [data]);
 return (
 <>
 <input onChange={handleChange} value={data} />
 <p>{count}</p>
 </>
 );
 }
 export default Counter;
In the third example, the handleChange function is used as an event handler for the onChange event of the input element. It updates the data state with the value of the input field whenever the user types.
Then, useEffect Hook updates the count state by incrementing its value by 1 whenever the data state changes.
The dependency array [data] indicates that the effect will run whenever the data state changes.
Must know: You can also select DOMelements using useEffectHook.Like this:
useEffect(() => {
 const card = document.querySelector(".container");
 const body = document.body;
 })
useRef Hook
In React useRef Hook allows you to create a mutable reference to a DOM element or any
other value. It’s a way to access and interact with DOM elements directly, without triggering a
re-render when the reference changes.
Accessing DOM elements by using useRef Hook
import React, { useRef, useEffect } from 'react';
 function MyComponent() {
 // Creating a ref to store a DOM element reference
 const myInputRef = useRef(null);
 // Using useEffect to focus the input when the component mounts
 useEffect(() => {
 if (myInputRef.current) {
 myInputRef.current.focus();
 }
 }, []);
 return (
 <div>
 <input type='text' ref={myInputRef} />
 </div>
 );
 }
 export default MyComponent;
In this example, we’re creating a ref using the useRef hook and assigning it to the ref attribute of the input element. We’re also using the useEffect hook to focus the input when the component mounts.
Notice that we’re accessing the DOM element using the.current property of the ref (myInputRef.current).
useContext Hook
React Context is a way to manage the state globally. Like, context provides a way to share data That is considered “global” which means you access the context of a parent component from a child component, without having to pass props through every level of the component tree.
By this Hook data can be shared across multiple components more efficiently and conveniently.
Example of useContext Hook
First, we have to create a context, so create ThemeContext.js file in the src folder.
import { createContext } from "react";
 const ThemeContext = createContext();
 export default ThemeContext;
Then here import the createContest Hook to create context.
After creating ThemeContext import it to your Root component (App.js).
Here the root component provides the context data to its child components using theThemeContext.Provider. The context value is provided as themeState, which value is set to the ‘dark’.
import "./App.css";
 import Header from "./components/Header";
 import ThemeContext from "./ThemeContext";
 function App() {
 const themeState = 'dark';
 return (
 <ThemeContext.Provider value={themeState}>
 <div className="App">
 <Header/>
 </div>
 </ThemeContext.Provider>
 );
 }
 export default App;
The value prop is set to themeState, which means that any child component inside the Provider can access this value using the useContext hook.
Now we can access this value in the Header component.
import React, {useContext} from 'react'
 import ThemeContext from './ThemeContext';
 function Header() {
 const themeState = useContext(ThemeContext);
 return (
 <header className={themeState}></header>
 )
 }
 export default Header;
As you can see in the above code of the Header component, I have imported the useContext Hook which is used to consume the context data from ThemeContext. The themeState variable now holds the value provided by the ThemeContext.Provider parent component.
useReducer Hook
The useReducer hook is used for managing more complex state logic in a component. It’s similar to useState Hook. It allows you to write custom state logic.
when you have complex state logic, changing more than 2-3 states in a function, then you
have to use useReducer Hook.
const [state, dispatch] = useReducer(reducer, initialState);
To use useReducer Hook obviously, we have to import it first.
import React, { useReducer } from 'react';
 // Reducer function: Takes current state and an action, returns new state
 const reducer = (state, action) => {
 switch (action.type) {
 case 'INCREMENT':
 return { count: state.count + 1 };
 case 'DECREMENT':
 return { count: state.count-1 };
 default:
 return state;
 }
 };
 function MyComponent() {
 // Initial state object
 const initialState = { count: 0 };
 // useReducer returns the current state and a dispatch function to update state
 const [state, dispatch] = useReducer(reducer, initialState);
 return (
 <div>
 <p>Count: {state.count}</p>
 <button onClick={() => dispatch({ type: 'DECREMENT' })}>Decrement</button>
 <button onClick={() => dispatch({ type: 'INCREMENT' })}>Increment</button>
 </div>
 );
 }
 export default MyComponent;
Step 1:
As you can see in the above code example, I have created a function called reducer.
Here the reducer function is defined outside the component. This function takes two parameters: the current state and an action object. It uses a switch statement to determine how the state should be updated based on the action type.
In this case, it handles two types of actions: ‘INCREMENT‘ and ‘DECREMENT‘, updating the count property accordingly.
Step 2:
Inside the MyComponent function, an initial state object named initialState is defined. Initially thecount value is set to 0.
Step 3:
Here the useReducer hook takes two arguments: the reducer function and the initialState object.
It returns two values: the state object representing the current state, and the dispatch function which is used to send actions to the reducer.
Step 4:
In JSX, I have added two button elements. One button is labeled “Decrement” and it has anonClick event handler that dispatches an action of type ‘DECREMENT‘ to the reducer.
The second button is labeled “Increment” and it dispatches an action of type ‘INCREMENT‘.
useCallback Hook
The useCallback Hook is used to memoize functions to optimize performance, especially in scenarios where the function references are passed down to child components as props.
It helps prevent unnecessary re-creation of functions on every render, which can lead to improved performance and reduced unnecessary re-renders.
MyComponent.js
import React, { useState, useCallback } from 'react';
 import SecondComponent from './SecondComponent';
 function MyComponent() {
 const [count, setCount] = useState(0);
 // Using useCallback to memoize the function
 const handleClick = useCallback(() => {
 console.log("Button clicked");
 }, []);
 return (
 <div>
 <p>Count: {count}</p>
 <button onClick={() => setCount(count + 1)}>Increment</button>
 <SecondComponent handleClick={handleClick}/>
 </div>
 );
 }
 export default MyComponent;
SecondComponent.js
 import React from 'react'
 function SecondComponent({handleClick}) {
 return (
 <div>
 <button onClick={handleClick}>Click me</button>
 </div>
 )
 }
export default SecondComponent;
The useCallback and useMemo Hooks are similar. The main difference is that useMemo returns a memoized value and useCallback returns a memoized function.
useMemo Hook
useMemo Hook returns a memoized value that can be particularly helpful for optimizing performance when dealing with expensive calculations or computations that don’t need to be re-evaluated on every render.
 import React, { useState, useMemo } from 'react';
 function MyComponent() {
 const [count, setCount] = useState(0);
 const doubledCount = useMemo(() => {
 return count * 2;
 }, [count]);
 return (
 <div>
 <p>Count: {count}</p>
 <p>Doubled Count: {doubledCount}</p>
 <button onClick={() => setCount(count + 1)}>Increment</button>
 </div>
 );
 }
 export default MyComponent;
Here in the above example, the useMemo hook is used to memoize the result of a computation.
In this case, the computation is simply doubling the value of the countstate. The function inside useMemo returns the computed value, count * 2.
The dependency array[count] specifies that the computation should be re-evaluated whenever the count state changes.
React Router
React Router is a standard and most popular library for routing in React. It is used to manage navigation and render different components as pages based on the URL.
React Router provides a set of components and functions, which makes it easy to create a dynamic single-page app in React.
As you do page routing in regular HTML, you have index.html which is your Home page and contact.html which is your Contact page, then when you navigate from the home page to contact page, the URL is something like this:
yourdomain.com/contact.html
And, the browser reloads every time when you navigate from one page to another page, that’s why it works very slowly.
But when you use React, page navigation is super fast, because the browser does not reload whenever you navigate page to page. Also, the URL looks like this:
yourdomain.com/contact
So let’s see How you can use React Router and implement the Routing feature in React.
Installation of React Router
To install react-router in your react app, write the following command and run this in your terminal.
npm install react-router-dom
Importing React Router
After installing the react-router-dom, import the necessary components from it. Import these in the App.js file.
import { BrowserRouter as Router, Routes, Route } from "react-router-dom";
Components in React Router
As you can see in the above code example, I have imported Three components of React Router from react-router-dom.
Here the Browser Router component is the primary component of the React Router, It is used to set up routing in the React app.
Here I have imported the Browser Router as Router, instead of writing Browser Router everywhere you can use the Router, it’s just the way to give it a shorter name. This will make your code more concise, behavior will be the same, only we give a name different to keep our code clean.
Apart from this, we have imported two more components from react-router-dom, which are Routes and Route.
Here the Routes component will contain all the routes, and the Route component will define different routes and associate them with specific components.
Routing Example – StaticRouting
Step 1
Before going further, let’s create some components for your react app. In the src folder create another folder named pages, then in side this, create Four new files:
Home.js-asHome page/main index page.About.js-as About page.Contact.js-as Contact page.NotFound.js-as 404 not found page.
├──src/
 │ ├──pages/
 │ │ ├──Home.js
 │ │ ├──About.js
 │ │ ├──Contact.js
 │ │ └──NotFound.js
I have added h1 elements in each component for displaying the Title text.
Home.js
 import React from 'react'
 function Home() {
 return (
 <h1>Home-Welcome</h1>
 )
 }
 export default Home;
About.js
 import React from 'react'
 function About() {
 return (
 <h1>About Page</h1>
 )
 }
 export default About;
Contact.js
 import React from 'react'
 function Contact() {
 return (
 <h1>Contact Page</h1>
 )
 }
 export default Contact;
NotFound.js
 import React from 'react'
 function NotFound() {
 return (
 <h1>404-Not Found</h1>
 )
 }
 export default NotFound;
Step 2
Then cometo your App.js file. Here import all the components from the src/pages directory which you have made previously. Delete all the JSX elements we inserted earlier.
Then inside the div JSX element. Add the Router component, then inside the Router component, Routes component is used to define the different routes and their associated components.
Then Route components are used to define individual routes.
The index keyword is used to indicate the default route. Each Route has a path and an element prop.
● The path prop defines the URL path associated with the route.
● The element prop specifies the component that should be rendered when the route is matched.
The last Route with path="*" acts as a “catch-all” route, It will render the NotFound(404 page) component when any of these defined components would not match.
//App.js
 import "./App.css";
 import React, { useEffect, useState } from "react";
 import { BrowserRouter as Router, Routes, Route } from "react-router-dom";
 import Home from "./pages/Home";
 import About from "./pages/About";
 import Contact from "./pages/Contact";
 import NotFound from "./pages/NotFound";
 function App() {
 return (
 <div className="App">
 <Router>
 <Routes>
 <Route index path="/" element={<Home/>} />
 <Route path="/about" element={<About/>} />
 <Route path="/contact" element={<Contact/>} />
 <Route path="*" element={<NotFound/>} />
 </Routes>
 </Router>
 </div>
 );
 }
 export default App;
Step 3
Then create a Header Component (Header.js) inside the src/components folder. Basically we will create a header navbar with navigation links.
import React from 'react'
 import { Link } from 'react-router-dom';
 function Header() {
 return (
 <header>
 <nav>
 <ul>
 <li>
 <Link to="/">Home</Link>
 </li>
 <li>
 <Link to="/about">About</Link>
 </li>
 <li>
 <Link to="/contact">Contact</Link>
 </li>
 </ul>
 </nav>
 </header>
 )
 }
 export default Header;
As you can see in the above code, I have imported the `Link` component from react-router-dom, it allows you to create links to different routes in your React Web App without the ‘<a></a>’ tag. Then import this Header component in your root component (`App.js`) and render inside the `Router` component, so that this Header Component will display in every route. Code example given below:
function App() {
 return (
 <div className="App">
 <Router>
 //Header Component inside the Router component.
 <Header />
 <Routes>
 <Route index path="/" element={<Home />} />
 <Route path="/about" element={<About />} />
 <Route path="/contact" element={<Contact />} />
 <Route path="*" element={<NotFound />} />
 </Routes>
 </Router>
 </div>
);
}
Final code of your Root Component (App.js):
//App.js
 import "./App.css";
 import React, { useEffect, useState } from "react";
 import { BrowserRouter as Router, Routes, Route } from "react-router-dom";
 import Home from "./pages/Home";
 import About from "./pages/About";
 import Contact from "./pages/Contact";
 import NotFound from "./pages/NotFound";
 import Header from "./components/Header";
 function App() {
 return (
 <div className="App">
 <Router>
 <Header />
 <Routes>
 <Route index path="/" element={<Home />} />
 <Route path="/about" element={<About />} />
 <Route path="/contact" element={<Contact />} />
 <Route path="*" element={<NotFound />} />
 </Routes>
 </Router>
 </div>
 );
 }
 export default App;
Dynamic Routing in React
Dynamic routing in React refers to the process of creating routes that can handle variable or dynamic parts in the URL. You can build more flexible and data-driven web apps using the dynamic routing feature in React Js, where different content is displayed based on the parameters in the URL.
Importance of Dynamic Routing than Static Routing
As we have learned earlier about the Static Routing Method in React. Suppose, You are building an e-commerce web app, you have 100 products and you want to display each product’s details as a specific product page based on their unique URLs. Like if you want to see the details of product no.1 then you would access the URL
https://yourdomain/product/1
So,for this you would have to manually create 100 routes and components for each product page.Like this:
import { BrowserRouter as Router, Routes, Route } from "react-router-dom";
 import Product1 from "./pages/Product1";
 import Product2 from "./pages/Product2";
 import Product3 from "./pages/Product3";
 import Product4 from "./pages/Product4";
 //...up to Product100
 function App() {
 return (
 <div className="App">
 <Router>
 <Routes>
 <Route path="/product/1" element={<Product1/>} />
 <Route path="/product/2" element={<Product2/>} />
 <Route path="/product/3" element={<Product3/>} />
 <Route path="/product/4" element={<Product4/>} />
 {/* ...more routes up to Product100 */}
 </Routes>
 </Router>
 </div>
 );
 }
 export default App;
No doubt this method will work fine, but hard to maintain and it’s not an efficient approach to do like this.
So, that’s why React provides us with the Dynamic Routing feature. Let’s see how you can simplify this process using Dynamic Routing?
Building a Dynamic Routing structure
Using Dynamic Routing, you can create a single route for all products, then you can fetch the content dynamically based on the URL parameters.
Step1:
First create a component inside the src/pages called Product.js, it will be our single component for all the products.
Then import this component in the Root Component (App.js), like this:
 import Product from "./pages/Product";

 <Routes>
 {/* dynamic route for products */}
 </Routes>
In the above code example,
● path="/product/:productId": This sets the URL pattern for the route. It uses a dynamic parameter:productId which indicates that the route can match URLs like/product/35, where 35 is the actual productId.
Step2:
Edit your Product.js Component, like this:
 import React from 'react'
 import { useParams } from 'react-router-dom';
 function Product() {
 const { productId } = useParams();
 return (
 <div>
 <h1>Product {productId}</h1>
 <p>This is the product about {productId}.</p>
 </div>
 )
 };
 export default Product;
In the above code of Product.js, as you can see, I have imported the useParams hook from react-router-dom.
Then const { productId } = useParams();: This line uses the useParams hook to extract the productId parameter from the URL. Here the useParams hook returns an object containing all the URL parameters specified in the route.
In this case, we are destructuring the productId parameter from that object. Then also I used that productId in the JSX elements.
Data Fetching from API in React
Data fetching is a common task in React applications, and there are several approaches and libraries you can use to fetch data from an API.
Using the fetch API method
The fetch API is built in to modern browsers and allows you to make HTTP requests very easily.It returns a Promise that resolves to the response from the server.
To make a simple GET request with fetch we just need to include the URL endpoint to which we want to make our request. We will make this request once our React component has mounted.
 import React, { useState, useEffect } from "react";
 function MyComponent() {
 const [data, setData] = useState(null);
 useEffect(() => {
 fetch("https://api.example.com/data")
 .then((response) => response.json())
 .then((data) => setData(data))
 .catch((error) => console.error("Error fetching data:", error));
 }, []);
 return (
 <div>
 <ul>
 {data.map((item) => (
 <li key={item.id}>{item.name}</li>
 ))}
 </ul>
 </div>
 );
 }
 export default MyComponent;
Here the useEffect hook is used to perform data fetching when the component mounts. It runs the provided function as a side effect. In this case, it fetches data from the URL “https://api.example.com/data”. When the response is received, it’s converted to JSON and the set Data function is called to update the data state. The empty dependency array [] ensures that this effect runs only once when component mounts.
Using Axios
Axios is a popular third-party library for making HTTP requests. It provides a simpler and more convenient way to handle network requests compared to the fetch API.
So first install Axios using npm. By running this command in terminal:
npm install axios
 import React, { useState, useEffect } from "react";
 function MyComponent() {
 const [data, setData] = useState(null);
 useEffect(() => {
 axios.get('https://api.example.com/data')
 .then(response => setData(response.data))
 .catch(error => console.error('Error fetching data:', error));
 }, []);
 return (
 <div>
 <ul>
 {data.map((item) => (
 <li key={item.id}>{item.name}</li>
 ))}
 </ul>
 </div>
 );
 }
 export default MyComponent;